com.capacitor-example.app. You’ll need to set up deep links using HTTPS domains.
Here’s how to set up OAuth authentication in your Capacitor app!
1. Install Capacitor OAuth dependencies
First, install the necessary Capacitor plugins for OAuth authentication:2. Configure OAuth providers in your dashboard
Go to your app in your developer dashboard and navigate to User management > Authentication > Socials. Enable the OAuth providers you want to support (Google, Apple, etc.). Configure your OAuth redirect URIs and allowed origins for your Capacitor app.Configure allowed origins
Navigate to App Settings > Domains and add platform-specific origins for your Capacitor app: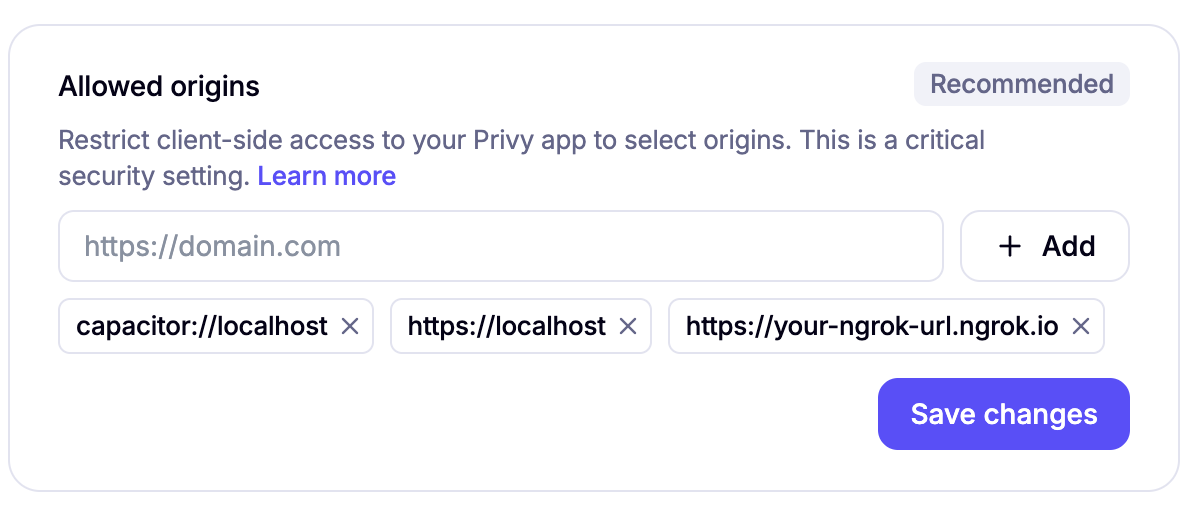
- Android:
https://localhost(origin for Capacitor Android apps) - iOS:
capacitor://localhost(origin for Capacitor iOS apps) - Development:
https://your-ngrok-url.ngrok.io(must match your redirect URL domain)
Configure allowed redirect URLs
Navigate to App Settings > Advanced and add your ngrok URL to the allowed redirect URLs: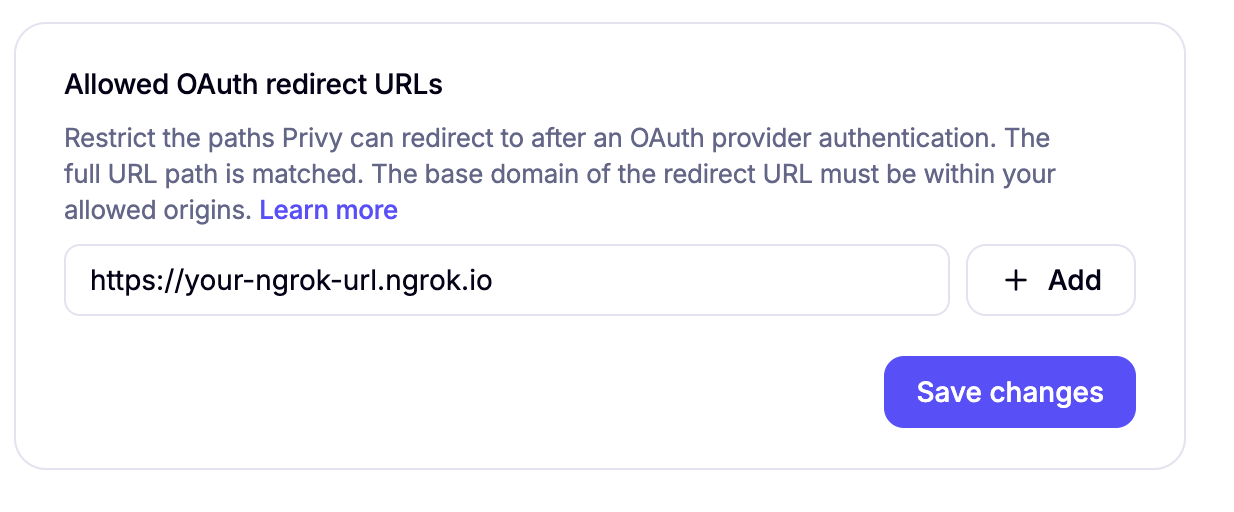
- Redirect URI:
https://your-ngrok-url.ngrok.io/redirect
Production deployment considerations
When deploying to production, you’ll need to update these settings:- Replace your ngrok URL with your production domain
- Update both the allowed redirect URLs and allowed origins to use your production domain
- The platform-specific origins (
https://localhostfor Android andcapacitor://localhostfor iOS) remain the same
3. Set up Capacitor configuration
Configure yourcapacitor.config.ts file to handle OAuth redirects:
4. Set up deep links with ngrok
For OAuth to work properly in your Capacitor app, you need to set up deep links. During development, you can use ngrok to create a public URL that redirects to your local app. Follow the Capacitor Deep Links guide to set up deep linking in your app. Once you have ngrok running, note your ngrok URL (e.g.,https://abc123.ngrok.io) as you’ll need it for the Privy configuration.
5. Add the AppUrlListener component
Create anAppUrlListener component to handle deep link redirects for OAuth flows. Add this component before your PrivyProvider:
This component is specifically for handling social login OAuth redirects. Other Privy
authentication methods (email, SMS, etc.) don’t require this setup.
6. Configure your Privy provider
Set up your Privy provider with deep link support for Capacitor:7. Platform-specific setup
- iOS
- Android
Configure your iOS app to handle OAuth redirects by adding URL schemes to your
Info.plist:8. Test your implementation
Test your OAuth implementation across different platforms:- Web: Test in your browser during development
- iOS Simulator: Test the native iOS OAuth flow
- Android Emulator: Test the native Android OAuth flow
- Physical devices: Test on real devices for the full experience