> ## Documentation Index
> Fetch the complete documentation index at: https://docs.privy.io/llms.txt
> Use this file to discover all available pages before exploring further.
# OAuth with Capacitor
**[Capacitor](https://capacitorjs.com/) is a cross-platform native runtime that makes it easy to build modern web apps that run natively on iOS, Android, and the web.** Capacitor apps can leverage native device capabilities while maintaining a single codebase.
**Privy enables your Capacitor apps to easily integrate OAuth authentication with native mobile OAuth flows.** This provides a seamless authentication experience that feels native to each platform while maintaining the flexibility of web-based development.
**Important**: OAuth for Capacitor requires Universal App Links (HTTPS URLs) and does not work with custom URL schemes like `com.capacitor-example.app`. You'll need to set up deep links using HTTPS domains.
Here's how to set up OAuth authentication in your Capacitor app!
Capacitor OAuth integration provides native authentication flows on mobile devices while falling
back to web-based OAuth on other platforms.
How does Capacitor OAuth work?
Capacitor OAuth leverages the native OAuth capabilities of each platform:
* **iOS**: Uses `ASWebAuthenticationSession` for secure in-app browser authentication
* **Android**: Uses Chrome Custom Tabs for secure authentication flows
* **Web**: Falls back to standard web OAuth flows
This approach provides the best user experience on each platform while maintaining code consistency across your app.
***
### 1. Install Capacitor OAuth dependencies
First, install the necessary Capacitor plugins for OAuth authentication:
```bash theme={"system"}
npm install @capacitor/browser
npm install @capacitor/app
```
Then sync your Capacitor project:
```bash theme={"system"}
npx cap sync
```
### 2. Configure OAuth providers in your dashboard
Go to your app in your [developer dashboard](https://dashboard.privy.io) and navigate to **User management > Authentication > Socials**. Enable the OAuth providers you want to support (Google, Apple, etc.).
Configure your OAuth redirect URIs and allowed origins for your Capacitor app.
#### Configure allowed origins
Navigate to **App Settings > Domains** and add platform-specific origins for your Capacitor app:
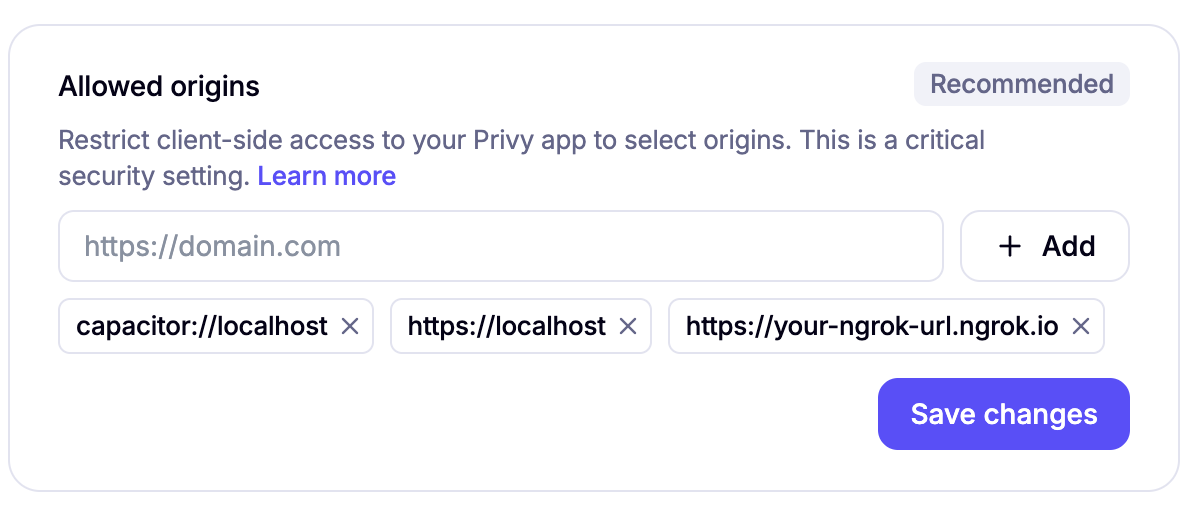 * **Android**: `https://localhost` (origin for Capacitor Android apps)
* **iOS**: `capacitor://localhost` (origin for Capacitor iOS apps)
* **Development**: `https://your-ngrok-url.ngrok.io` (must match your redirect URL domain)
#### Configure allowed redirect URLs
Navigate to **App Settings > Advanced** and add your ngrok URL to the allowed redirect URLs:
* **Android**: `https://localhost` (origin for Capacitor Android apps)
* **iOS**: `capacitor://localhost` (origin for Capacitor iOS apps)
* **Development**: `https://your-ngrok-url.ngrok.io` (must match your redirect URL domain)
#### Configure allowed redirect URLs
Navigate to **App Settings > Advanced** and add your ngrok URL to the allowed redirect URLs:
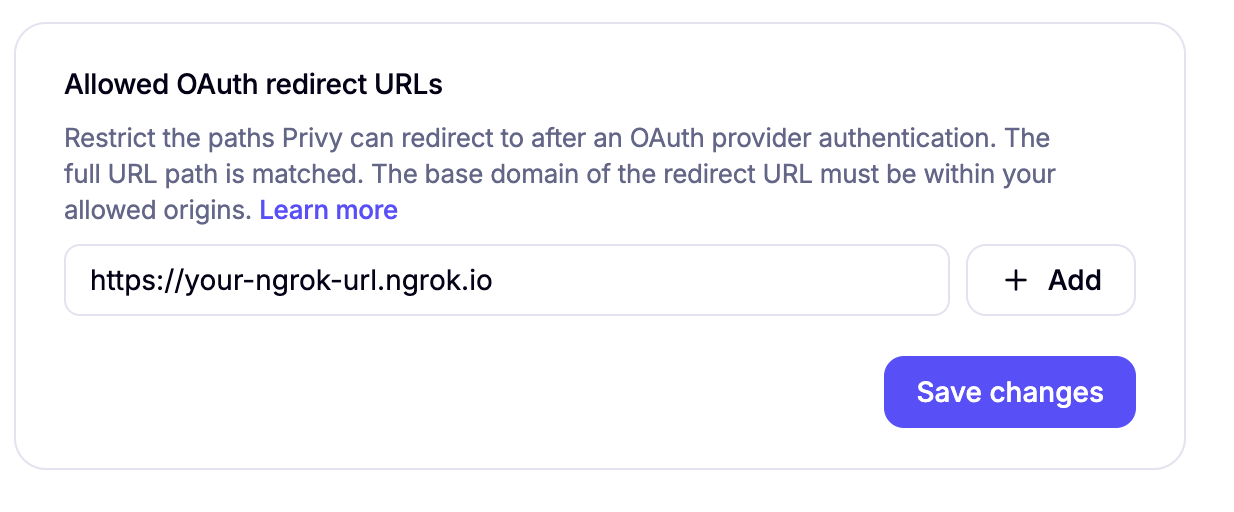 * Redirect URI: `https://your-ngrok-url.ngrok.io/redirect`
For more information on configuring OAuth redirect URLs, see our [allowed OAuth redirects guide](/recipes/react/allowed-oauth-redirects).
The allowed OAuth redirect URL domain must match your allowed origins. Both should use the same
ngrok domain during development.
#### Production deployment considerations
When deploying to production, you'll need to update these settings:
* Replace your ngrok URL with your production domain
* Update both the allowed redirect URLs and allowed origins to use your production domain
* The platform-specific origins (`https://localhost` for Android and `capacitor://localhost` for iOS) remain the same
### 3. Set up Capacitor configuration
Configure your `capacitor.config.ts` file to handle OAuth redirects:
```typescript theme={"system"}
import type {CapacitorConfig} from '@capacitor/cli';
const config: CapacitorConfig = {
appId: 'com.yourcompany.yourapp',
appName: 'your-app-name',
webDir: 'dist',
plugins: {
App: {
urlScheme: 'com.yourcompany.yourapp'
}
}
};
export default config;
```
### 4. Set up deep links with ngrok
For OAuth to work properly in your Capacitor app, you need to set up deep links. During development, you can use ngrok to create a public URL that redirects to your local app.
Follow the [Capacitor Deep Links guide](https://capacitorjs.com/docs/guides/deep-links) to set up deep linking in your app.
Once you have ngrok running, note your ngrok URL (e.g., `https://abc123.ngrok.io`) as you'll need it for the Privy configuration.
Remember to update your ngrok domain in both your Privy provider configuration and dashboard
settings when the ngrok URL changes.
### 5. Add the AppUrlListener component
Create an `AppUrlListener` component to handle deep link redirects for OAuth flows. Add this component before your `PrivyProvider`:
This component is specifically for handling social login OAuth redirects. Other Privy
authentication methods (email, SMS, etc.) don't require this setup.
```tsx theme={"system"}
import {useEffect} from 'react';
import {App} from '@capacitor/app';
export const AppUrlListener = () => {
useEffect(() => {
App.addListener('appUrlOpen', (event) => {
try {
const deepLinkUrl = new URL(event.url);
// Extract search params from deep link
if (
deepLinkUrl.search &&
deepLinkUrl.searchParams.has('privy_oauth_code') &&
deepLinkUrl.searchParams.has('privy_oauth_state') &&
deepLinkUrl.searchParams.has('privy_oauth_provider')
) {
const currentUrl = new URL(window.location.href);
currentUrl.search = deepLinkUrl.search;
window.location.assign(currentUrl.toString());
}
} catch (error) {
console.error('Failed to parse deep link URL:', error);
}
});
}, []);
return null;
};
```
### 6. Configure your Privy provider
Set up your Privy provider with deep link support for Capacitor:
```tsx theme={"system"}
import {PrivyProvider} from '@privy-io/react-auth';
import {Capacitor} from '@capacitor/core';
import {AppUrlListener} from './AppUrlListener';
function App() {
return (
<>
{/* Your app content */}
);
}
```
### 7. Platform-specific setup
Configure your iOS app to handle OAuth redirects by adding URL schemes to your `Info.plist`:
```xml theme={"system"}
CFBundleURLTypes
CFBundleURLName
com.yourcompany.yourapp
CFBundleURLSchemes
com.yourcompany.yourapp
```
Configure your Android app to handle OAuth redirects by adding intent filters to your `AndroidManifest.xml`:
```xml theme={"system"}
```
Your development server must be running and configured to serve the `assetlinks.json` file for
Android and `apple-app-site-association` file for iOS. See the [Capacitor Deep Links
guide](https://capacitorjs.com/docs/guides/deep-links) for more details on configuring these
files.
### 8. Test your implementation
Test your OAuth implementation across different platforms:
1. **Web**: Test in your browser during development
2. **iOS Simulator**: Test the native iOS OAuth flow
3. **Android Emulator**: Test the native Android OAuth flow
4. **Physical devices**: Test on real devices for the full experience
That's it! Your Capacitor app now supports native OAuth authentication across all platforms while maintaining a single codebase.
Remember to test your OAuth flows on actual devices, as the authentication experience can differ
between simulators and real devices.
* Redirect URI: `https://your-ngrok-url.ngrok.io/redirect`
For more information on configuring OAuth redirect URLs, see our [allowed OAuth redirects guide](/recipes/react/allowed-oauth-redirects).
The allowed OAuth redirect URL domain must match your allowed origins. Both should use the same
ngrok domain during development.
#### Production deployment considerations
When deploying to production, you'll need to update these settings:
* Replace your ngrok URL with your production domain
* Update both the allowed redirect URLs and allowed origins to use your production domain
* The platform-specific origins (`https://localhost` for Android and `capacitor://localhost` for iOS) remain the same
### 3. Set up Capacitor configuration
Configure your `capacitor.config.ts` file to handle OAuth redirects:
```typescript theme={"system"}
import type {CapacitorConfig} from '@capacitor/cli';
const config: CapacitorConfig = {
appId: 'com.yourcompany.yourapp',
appName: 'your-app-name',
webDir: 'dist',
plugins: {
App: {
urlScheme: 'com.yourcompany.yourapp'
}
}
};
export default config;
```
### 4. Set up deep links with ngrok
For OAuth to work properly in your Capacitor app, you need to set up deep links. During development, you can use ngrok to create a public URL that redirects to your local app.
Follow the [Capacitor Deep Links guide](https://capacitorjs.com/docs/guides/deep-links) to set up deep linking in your app.
Once you have ngrok running, note your ngrok URL (e.g., `https://abc123.ngrok.io`) as you'll need it for the Privy configuration.
Remember to update your ngrok domain in both your Privy provider configuration and dashboard
settings when the ngrok URL changes.
### 5. Add the AppUrlListener component
Create an `AppUrlListener` component to handle deep link redirects for OAuth flows. Add this component before your `PrivyProvider`:
This component is specifically for handling social login OAuth redirects. Other Privy
authentication methods (email, SMS, etc.) don't require this setup.
```tsx theme={"system"}
import {useEffect} from 'react';
import {App} from '@capacitor/app';
export const AppUrlListener = () => {
useEffect(() => {
App.addListener('appUrlOpen', (event) => {
try {
const deepLinkUrl = new URL(event.url);
// Extract search params from deep link
if (
deepLinkUrl.search &&
deepLinkUrl.searchParams.has('privy_oauth_code') &&
deepLinkUrl.searchParams.has('privy_oauth_state') &&
deepLinkUrl.searchParams.has('privy_oauth_provider')
) {
const currentUrl = new URL(window.location.href);
currentUrl.search = deepLinkUrl.search;
window.location.assign(currentUrl.toString());
}
} catch (error) {
console.error('Failed to parse deep link URL:', error);
}
});
}, []);
return null;
};
```
### 6. Configure your Privy provider
Set up your Privy provider with deep link support for Capacitor:
```tsx theme={"system"}
import {PrivyProvider} from '@privy-io/react-auth';
import {Capacitor} from '@capacitor/core';
import {AppUrlListener} from './AppUrlListener';
function App() {
return (
<>
{/* Your app content */}
);
}
```
### 7. Platform-specific setup
Configure your iOS app to handle OAuth redirects by adding URL schemes to your `Info.plist`:
```xml theme={"system"}
CFBundleURLTypes
CFBundleURLName
com.yourcompany.yourapp
CFBundleURLSchemes
com.yourcompany.yourapp
```
Configure your Android app to handle OAuth redirects by adding intent filters to your `AndroidManifest.xml`:
```xml theme={"system"}
```
Your development server must be running and configured to serve the `assetlinks.json` file for
Android and `apple-app-site-association` file for iOS. See the [Capacitor Deep Links
guide](https://capacitorjs.com/docs/guides/deep-links) for more details on configuring these
files.
### 8. Test your implementation
Test your OAuth implementation across different platforms:
1. **Web**: Test in your browser during development
2. **iOS Simulator**: Test the native iOS OAuth flow
3. **Android Emulator**: Test the native Android OAuth flow
4. **Physical devices**: Test on real devices for the full experience
That's it! Your Capacitor app now supports native OAuth authentication across all platforms while maintaining a single codebase.
Remember to test your OAuth flows on actual devices, as the authentication experience can differ
between simulators and real devices.